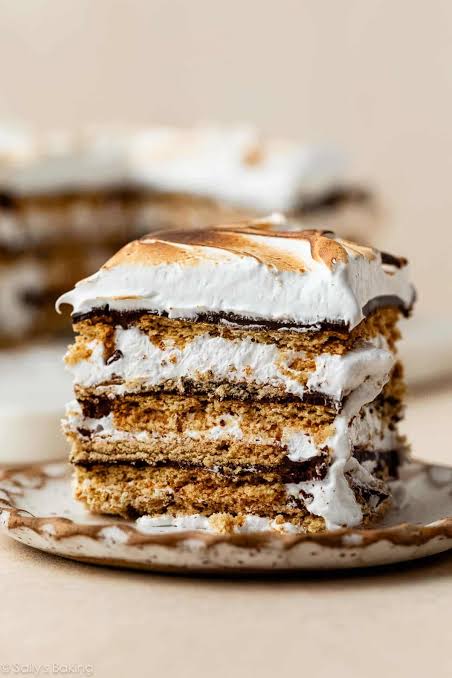

Making a delicious cake at home does not always require an oven. A no-bake cake is an excellent choice for anyone who wants to prepare a sweet treat with simple ingredients and minimal equipment. Whether you are a beginner in the kitchen, a student, or someone looking for an easy dessert for family gatherings, learning how to make a perfect no-bake cake can help you create something special without complicated baking techniques.
No-bake cakes come in many varieties, including chocolate biscuit cakes, creamy cheesecake, vanilla desserts, and layered chocolate treats. They are usually prepared by combining a crunchy base with a smooth filling and allowing the dessert to set in the refrigerator. With the right ingredients, preparation methods, and chilling time, you can make a cake that looks attractive and tastes wonderful.
What Is a No-Bake Cake?
A no-bake cake is a dessert prepared without using a traditional oven. Instead of baking the mixture, you combine ingredients that hold their shape after refrigeration. Depending on the recipe, these ingredients may include biscuits, butter, cream cheese, whipped cream, chocolate, condensed milk, or fresh fruit.
The main advantage of a no-bake cake is its simplicity. You do not need to worry about oven temperature, cake batter rising, or checking whether the center is fully baked. Most recipes require only mixing, layering, and chilling.
No-bake cakes are also flexible. You can adjust their sweetness, change the flavors, and decorate them according to your preferences. This makes them suitable for birthdays, celebrations, afternoon snacks, and casual family dinners.
Ingredients Needed to Make a No-Bake Cake
Before starting, collect all your ingredients and equipment. Having everything ready makes preparation easier and helps you avoid mistakes.
Ingredients for the Biscuit Base
- 250 grams of plain digestive biscuits or tea biscuits
- 100 grams of melted butter
- 1 tablespoon of cocoa powder, optional
The biscuit base provides structure and a pleasant crunch. Butter binds the crushed biscuits together, helping the base become firm when chilled. Cocoa powder adds a chocolate flavor if desired.
Ingredients for the Creamy Filling
- 200 grams of cream cheese, softened
- 200 milliliters of whipping cream, cold
- 100 grams of powdered sugar, adjusted to taste
- 1 teaspoon of vanilla extract
- 100 grams of melted chocolate, optional
These ingredients create a smooth and creamy filling. You can use chocolate for a richer flavor or leave it out for a simple vanilla cake.
Ingredients for Decoration
- Chocolate shavings
- Crushed biscuits
- Fresh strawberries or other fruit
- Cocoa powder
- Chocolate sauce
Choose one or two decorations to keep the cake attractive without making it overly complicated.
Step-by-Step Guide to Making a Perfect No-Bake Cake
Step 1: Prepare the Biscuit Crumbs
Place the biscuits in a clean bowl or food processor and crush them until they become fine crumbs. If you do not have a food processor, put the biscuits in a sealed food bag and gently crush them with a rolling pin.
Try to make the crumbs relatively even. Large pieces can prevent the base from holding together properly, while fine crumbs create a smoother texture.
Transfer the crushed biscuits to a mixing bowl. If you want a chocolate-flavored base, add the cocoa powder and mix thoroughly.
Step 2: Mix in the Melted Butter
Pour the melted butter over the biscuit crumbs and stir until everything is evenly combined. The mixture should resemble damp sand and hold together when pressed between your fingers.
If the crumbs appear too dry, add a small amount of melted butter. Avoid adding too much because an overly greasy base may become heavy.
Step 3: Press the Base into a Cake Pan
Choose a small springform pan or another suitable container. Line the base with parchment paper to make removing the cake easier.
Transfer the biscuit mixture into the pan. Use the back of a spoon or the bottom of a flat glass to press it firmly into an even layer.
Pay special attention to the edges because loose crumbs can make the finished cake difficult to slice. Place the pan in the refrigerator for approximately 20 to 30 minutes while you prepare the filling.
Step 4: Prepare the Creamy Filling
Place the softened cream cheese and powdered sugar in a large bowl. Beat them together until the mixture becomes smooth and creamy. Add the vanilla extract and mix again.
In a separate chilled bowl, whip the cold whipping cream until it forms soft to medium peaks. Avoid overwhipping because the cream can become grainy.
Gently fold the whipped cream into the cream cheese mixture using a spatula. Work slowly to preserve the light texture.
If you prefer a chocolate cake, allow the melted chocolate to cool slightly before incorporating it into the filling. Chocolate that is too hot may affect the cream’s texture.
Step 5: Assemble the Cake
Remove the chilled biscuit base from the refrigerator. Spoon the creamy filling over it and spread the mixture evenly with a spatula.
Tap the pan gently against the counter to help remove large air pockets. Smooth the surface so that the cake looks neat when served.
For a layered dessert, you can alternate the biscuit mixture and filling. You may also add a thin layer of fruit between the layers for additional flavor.
Step 6: Refrigerate Until Firm
Cover the cake and place it in the refrigerator for at least four to six hours. For the best results, leave it overnight.
Chilling allows the butter in the base to firm up and gives the filling time to become more stable. Avoid rushing this stage because a cake that has not set properly may fall apart when sliced.
Keep the cake refrigerated throughout the setting process. Since the filling contains dairy products, it should not be left at room temperature for extended periods.
Step 7: Decorate and Serve
Once the cake is firm, carefully remove it from the pan. If necessary, run a thin knife around the edge before releasing the sides of a springform pan.
Decorate the top with chocolate shavings, fresh fruit, crushed biscuits, or a light dusting of cocoa powder.
Use a clean, sharp knife to cut the cake into slices. Wiping the knife between cuts can help produce cleaner edges.
Serve the cake chilled for a refreshing dessert with a creamy filling and a crunchy base.
Tips for Making the Perfect No-Bake Cake
Choose the Right Biscuits
Plain digestive biscuits, graham crackers, and tea biscuits work well for most no-bake cake bases. Chocolate biscuits can be used when you want a deeper chocolate flavor.
Use Cold Whipping Cream
Cold cream generally whips more effectively than warm cream. Chilling the mixing bowl and beaters can also help you achieve a better texture.
Avoid Overmixing
When combining whipped cream with the cream cheese mixture, fold gently rather than beating vigorously. This helps maintain a light and airy filling.
Give the Cake Enough Chilling Time
One of the most common mistakes is cutting the cake too early. Allowing sufficient refrigeration time helps the dessert hold its shape and improves the overall texture.
Balance the Sweetness
Biscuits, chocolate, and condensed milk can already contain considerable sugar. Taste the filling before adding extra sweetener, and adjust the quantity according to your preference.
Popular No-Bake Cake Variations
Chocolate No-Bake Cake
Chocolate lovers can add cocoa powder to the biscuit base and melted chocolate to the filling. Finish with chocolate curls or a thin chocolate topping for an indulgent dessert.
Strawberry No-Bake Cake
For a fruity variation, arrange sliced strawberries over the biscuit base before adding the filling, or decorate the finished cake with fresh berries. Keep fruit dry before adding it to prevent excess moisture.
Vanilla Cream Cake
A vanilla version uses cream cheese, whipped cream, and vanilla extract without chocolate. Its mild flavor pairs well with fresh fruit, caramel sauce, or crushed biscuits.
Coffee-Flavored No-Bake Cake
Mix a small amount of dissolved instant coffee into the filling for a subtle coffee flavor. You can also create biscuit layers lightly dipped in cooled coffee, making sure they do not become overly soggy.
Common Mistakes to Avoid
Several small mistakes can affect the quality of a no-bake cake. Using too little butter may cause the biscuit base to crumble, while adding too much can make it greasy. Measuring ingredients carefully helps create a balanced texture.
Another mistake is using warm cream or adding hot chocolate directly to the filling. Both can interfere with the consistency of the mixture. Allow melted chocolate to cool until it is no longer hot before mixing it in.
Do not skip refrigeration or place the cake in the freezer for only a few minutes and expect the same texture. Gradual chilling allows the filling to set more evenly.
Finally, avoid adding too much liquid flavoring. Excess liquid can make the filling soft and prevent the cake from holding its shape.
How to Store a No-Bake Cake
Store your finished cake in a covered container in the refrigerator. For a cake containing cream cheese and whipped cream, a practical guideline is to consume it within three to four days, provided it has been handled safely and kept at 4°C (40°F) or below.
If you want to prepare the dessert ahead of time, make it the evening before your event. Add delicate fruit decorations shortly before serving for a fresher appearance.
Some no-bake cakes can also be frozen, depending on their ingredients. However, freezing may change the texture of fresh fruit and dairy-based fillings. If freezing is suitable for your recipe, wrap individual portions securely and thaw them in the refrigerator.
Conclusion
Learning how to make a perfect no-bake cake without using an oven is a simple way to enjoy homemade desserts with minimal equipment. By preparing a firm biscuit base, mixing a smooth filling, assembling the layers carefully, and allowing enough time for refrigeration, you can create a delicious cake for almost any occasion.
The recipe is also easy to customize. You can experiment with chocolate, vanilla, strawberries, coffee, and different biscuit varieties to discover your favorite combination.
The secret to success is using balanced ingredients, handling the cream gently, and being patient while the cake sets. With these practical techniques, even beginners can prepare an attractive no-bake cake that tastes delicious and is ready to share with family and friends.